Tuesday, December 1, 2020

Mount linux partition to windows


Local Windows access remote Linux with samba


在linux服务器上配置samba,有两种方式:share方式,user方式。

1. share方式:也就是访问共享文件夹时不需要输入共享文件夹的密码,所有guest都能访问。这种不需要密码的访问当然不安全,但是很方便,也是比较常用的方式。配置步骤如下:

(1) Install samba
sudo apt-get install samba
(2)配置samba
sudo vi /etc/samba/smb.conf
打开这个文件后,按如下添加信息:
[share]
comment = yangxxxx samba share dir
path = /home/wxxhxx/share
browseable = yes
guest ok = yes
create mask = 0777
writable = yes
在这里插入图片描述
注意:这里的写权限单词不要拼写错了writable。
注意:samba版本,我是samba4.7,其中已经没有security = share这种写法了,有的网上资料里都会配置这个参数,这是以前的写法,samba4里面用的是map to guest = Bad User。
保存配置。
(3)重启samba服务:sudo /etc/init.d/smbd restart
(4) windows下访问:
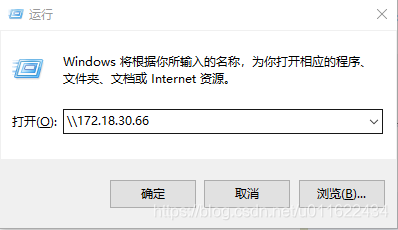
win+r打开这面运行框,输入linux的ip地址后点确定。
在这里插入图片描述
可以看到linux下创建的share共享文件夹,因为我开通了所有权限,所以在这里啥都可以干,新建、修改、删除文件都可以。
在这里插入图片描述


2.user方式:也就是指定的user才有权访问共享文件夹。配置步骤如下:

(1)首先要创建samba user
sudo useradd yangxxsmb (这个名字自定义)
sudo smbpasswd -a yangxxsmb (给这个用户设置访问密码,自定义一个密码,系统会要求输入两边密码,密码自己要记好不然访问不了共享文件夹了。)
(2)samba配置
sudo vi /etc/samba/smb.conf
打开文件,按如下配置,没有的就手动添加。
[share]
comment = yangxxxx samba share dir
path = /home/wxxhxx/share
browseable = yes
writable = yes
valid users = yangxxsmb

(3)重启samba服务
sudo /etc/init.d/smbd restart
(4) windows访问共享文件夹
win+r打开这面运行框,输入linux的ip地址后点确定。
在这里插入图片描述
可以看到share文件夹,但是要访问时需要输入用户名和密码,就是步骤(2)中设置的用户名和密码,输入之后就可以访问了,也可以在里面新建、修改、删除文件。
在这里插入图片描述

Fix docker: Got permission denied while trying to connect to the Docker daemon socket

 According to the official Docker docs here:

https://docs.docker.com/install/linux/linux-postinstall/#manage-docker-as-a-non-root-user

You need to do the following:

To create the docker group and add your user:

  • Create the docker group.
sudo groupadd docker
  • Add your user to the docker group.
sudo usermod -aG docker ${USER}
  • You would need to loog out and log back in so that your group membership is re-evaluated or type the following command:
su -s ${USER}
  • Verify that you can run docker commands without sudo.
docker run hello-world
  • This command downloads a test image and runs it in a container. When the container runs, it prints an informational message and exits.

  • If you initially ran Docker CLI commands using sudo before adding your user to the docker group, you may see the following error, which indicates that your ~/.docker/ directory was created with incorrect permissions due to the sudo commands.

WARNING: Error loading config file: /home/user/.docker/config.json -
stat /home/user/.docker/config.json: permission denied
  • To fix this problem, either remove the ~/.docker/ directory (it is recreated automatically, but any custom settings are lost), or change its ownership and permissions using the following commands:
sudo chown "$USER":"$USER" /home/"$USER"/.docker -R
sudo chmod g+rwx "$HOME/.docker" -R

Wednesday, November 25, 2020

Install virtualenv

# Step 1: Update your repositories
sudo apt-get update
# Step 2: Install pip for Python 3
sudo apt-get install build-essential libssl-dev libffi-dev python-dev
sudo apt install python3-pip
# Step 3: Use pip to install virtualenv
sudo pip3 install virtualenv
# Step 4: Launch your Python 3 virtual environment, here the name of my virtual environment will be env3
virtualenv -p python3 env3
# Step 5: Activate your new Python 3 environment. There are two ways to do this
. env3/bin/activate # or source env3/bin/activate which does exactly the same thing
# you can make sure you are now working with Python 3
python -- version
# this command will show you what is going on: the python executable you are using is now located inside your virtualenv repository
which python
# Step 6: code your stuff
# Step 7: done? leave the virtual environment
deactivate


Friday, September 11, 2020

rsync with a non-standard port

 rsync -avz -e "ssh -p $portNumber" user@remoteip:/path/to/files/ /local/path/

Tuesday, September 1, 2020

Common cmd of ffmpeg

 Images -> video

    ffmpeg -r 30 -f image2 -s 1280x720 -start_number 1 -i %06d.png -vframes 1000 -vcodec libx264 -crf 25  -pix_fmt yuv420p out.mp4


Video -> frames with specifc frame index

 cmd = "ffmpeg -i {} -vf select='between(n\,{}\,{})' -vsync 0 -start_number {} {}/%06d.jpg".format(video_path, s, t, s, out_path)


Tuesday, August 4, 2020

Move an Apache Web Root Directory to a New Location on Ubuntu

How To Move an Apache Web Root Directory to a New Location on Ubuntu 

From https://www.digitalocean.com/community/tutorials/how-to-move-an-apache-web-root-to-a-new-location-on-ubuntu-16-04

Prerequisites

To complete this guide, you will need:

  • An Ubuntu 16.04 server with a non-root user with sudo privileges. You can learn more about how to set up a user with these privileges in our Initial Server Setup with Ubuntu 16.04 guide.

  • An Apache2 web server: If you haven’t already set one up, the Apache section of the in-depth article, How To Install Linux, Apache, MySQL, PHP (LAMP) stack on Ubuntu 16.04, can guide you.

  • A new location for your document root: The new document root location is completely configurable based on your needs. If you are moving your document root to a different storage device, you will want to select a location under the device’s mount point.

In this example, we will use the /mnt/volume-nyc1-01 directory. If you are using Block Storage on DigitalOcean, this guide will show you how to mount your drive before continuing with this tutorial.

Step 1 — Copying files to the new location

On a fresh installation of Apache, the document root is located at /var/www/html. If you’re working with an existing server, however, you may have a significantly different setup including multiple document roots in corresponding VirtualHost directives.

You can search for the location of additional document roots using grep. We’ll search in the /etc/apache2/sites-enabled directory to limit our focus to active sites. The -R flag ensures that grep will print both the DocumentRoot and the filename in its output:

  • grep -R "DocumentRoot" /etc/apache2/sites-enabled

The result will look something like the output below, although the names and number of results are likely to be different on an existing installation:

Output
sites-enabled/000-default.conf DocumentRoot /var/www/html

Use the feedback from grep to make sure you’re moving the files that you want to move and updating their appropriate configuration files.

Now that we’ve confirmed the location of our document root, we’ll copy the files to their new location with rsync. Using the -a flag preserves the permissions and other directory properties, while-v provides verbose output so you can follow the progress.

Note: Be sure there is no trailing slash on the directory, which may be added if you use tab completion. When there’s a trailing slash, rsync will dump the contents of the directory into the mount point instead of transferring it into a containing html directory:

  • sudo rsync -av /var/www/html /mnt/volume-nyc1-01

Now we’re ready to update the configuration.

Step 2 — Updating the configuration files

Apache2 makes use of both global and site specific configuration files. For background about the hierarchy of configuration files, take a look at How To Configure the Apache Web Server on an Ubuntu or Debian VPS.

If you’re working with an existing installation, you should modify the virtual host files you found earlier with the grep command. For our example, we’re going to look at the two Virtual Host files that ship with Apache by default, 000-default.conf and default-ssl.conf.

We’ll start by editing the 000-default.conffile:

  • sudo nano /etc/apache2/sites-enabled/000-default.conf

Next we’ll find the line that begins with DocumentRoot and update it with the new location.

Note: You should look for other places the original path showed up, and change those to the new location as well. With a default installation, there’s the DocumentRoot and a Directory block you’ll need to change. On an existing installation, you may find things like aliases and rewrites that need updating, too. Wherever you see the original document root’s path in the output of grep, you’ll need to investigate.

/etc/apache2/sites-enabled/000-default.conf
<VirtualHost *:80>
        ServerAdmin webmaster@localhost
       DocumentRoot /mnt/volume-nyc1-01/html
        <Directory />
                Options FollowSymLinks
                AllowOverride None
       </Directory>
      <Directory /mnt/volume-nyc1-01/html/>
                Options Indexes FollowSymLinks MultiViews
                AllowOverride None
                Require all granted
        </Directory>

Step 3 — Restarting Apache

Once you’ve finished the configuration changes, you can make sure the syntax is right with configtest:

  • sudo apachectl configtest

You will get feedback from apachectl configtest with a fresh install:

Output
AH00558: apache2: Could not reliably determine the server's fully qualified domain name, using 127.0.1.1. Set the 'ServerName' directive globally to suppress this message Syntax OK

As long as you get Syntax OK, restart the web server. Otherwise, track down and fix the problems it reported.

Use the following command to restart Apache:

  • sudo systemctl reload apache2

Thursday, July 16, 2020

File read error when using multithreading (workers)

Detectoron2, pythorch 1.5
panda.read_csv() error
"
pandas.errors.ParserError: Error tokenizing data. C error: Calling read(nbytes) on source failed. Try engine='python'.
"

Need to use with to keep file is closed after reading.

Solution

with open(filename) as f:
  df = panda.read_csv(f)

Wednesday, May 20, 2020

Install cuda 10.2

1. Uninstall existing nvidia driver

nvidia-installer --uninstall

or

The correct way to uninstall just cuda and keep your nvidia drivers would be:
sudo apt purge "libcublas*" "cuda-*" cuda
Possible, because they were installed as requirements, you can also purge,
sudo apt purge "nsight-*" nvidia-modprobe
After that you can, if you want, also remove the nvidia drivers with:
sudo apt purge "*nvidia*"
Of course, if you installed cuda using nvidia's .run file then this won't work; in that case you probably have some uninstall script.

2. Close X server
# To stop:
sudo init 3
# To resume:
sudo init 5
3. Download & install
wget http://developer.download.nvidia.com/compute/cuda/10.2/Prod/local_installers/cuda_10.2.89_440.33.01_linux.runsudo sh cuda_10.2.89_440.33.01_linux.run

Thursday, May 14, 2020

Screen permission denied


Problem
Cannot make directory '/var/run/screen': Permission denied
Solution
sudo /etc/init.d/screen-cleanup start

Thursday, March 5, 2020

Change ssh port for ubuntu

  1. Edit the file and set Port option

    Type the following command:
    $ sudo vi /etc/ssh/sshd_config
    Locate line that read as follows:
    Port 22
    OR
    #Port 22
    To set the port to 2222, enter:
    Port 2222
  2. Updating your firewall to accept the ssh port 2222 in Linux

    If you are using UFW on a Ubuntu/Debian Linux, type:
    $ sudo ufw allow 2222/tcp
    The syntax for iptables is as follows
    $ sudo /sbin/iptables -A INPUT -m state --state NEW -m tcp -p tcp --dport 2222 -j ACCEPT

  3. OR if you are using Ubuntu/Debian/Mint Linux:
    $ sudo service ssh restart
Test
ssh xxxx.xxxx.xxxx.xxxx -p 2222

Tuesday, March 3, 2020

Windows install pip

1. Open cmd as administrator
2. Install python
3. curl https://bootstrap.pypa.io/get-pip.py -o get-pip.py
4. Then run the following command in the folder where you have downloaded get-pip.py:
python get-pip.py

5. Add pip installation path to environment PATH
6. check
pip help