Monday, December 17, 2018

Mixed installation and usage of opencv 2&3 (windows & linux)

System: Windows

Architecture: x64
Compiler: Visual studio
https://www.learnopencv.com/install-opencv3-on-windows/

Linux

To keep both opencv2 and opencv3
1. Uninstall opencv2 and opencv3, remove or lib and include files in /usr/ or /usr/local/
2. Install in local directory

The default install folder of OpenCV is /usr/local/. You can install OpenCV 3.1 to a separate location, say /home/your_username/opencv_3.1 with CMake option
cmake -D CMAKE_INSTALL_PREFIX=/home/your_username/opencv_3.1
To build your project with OpenCV 3.1 using CMake, add
set(OpenCV_DIR /home/your_username/opencv_3.1/share/OpenCV)
to your CMakeLists.txt, after project(projName). You can also link the corresponding libraries/headers manually or with IDE.

Manuall settings for OpenCV directory

When you manually set opencv directory, if you have problems in cmake


CMake Warning at C:/opencv-2.4.9/build/install/OpenCVConfig.cmake:165 (message):
  Found OpenCV Windows Pack but it has not binaries compatible with your
  configuration.

  You should manually point CMake variable OpenCV_DIR to your build of OpenCV
  library.
Call Stack (most recent call first):
  CMakeLists.txt:79 (find_package)


CMake Error at CMakeLists.txt:79 (find_package):
  Found package configuration file:

    C:/opencv-2.4.9/build/install/OpenCVConfig.cmake

  but it set OpenCV_FOUND to FALSE so package "OpenCV" is considered to be
  NOT FOUND.

There is a problem in opencv 2.4.8 in build/install/OpenCVConfig.cmake, so you should set the OpenCV_DIR as the build directory, and also set the OPCV_FOUND to true.
In the cmake file, add the following lines

 1
 2
 3
 4
 5
 6
 7
 8
 9
10
SET("OpenCV_DIR" "C:\\opencv-2.4.9\\build\\")
find_package(OpenCV REQUIRED)
set(OpenCV_FOUND TRUE)
if (NOT OpenCV_FOUND)
    message(FATAL_ERROR "OpenCV library not found")
else()
 include_directories(${OpenCV_INCLUDE_DIRS})
 include_directories(${OpenCV2_INCLUDE_DIRS})
 link_directories(${OpenCV_LIB_DIR})
endif()


Tuesday, December 11, 2018

Update cmake version without default setting in ubuntu


  1. Check your current version with cmake --version
  2. Uninstall it with sudo apt remove cmake
  3. Visit https://cmake.org/download/ and download the latest binaries
    • In my case cmake-3.6.2-Linux-x86_64.sh is sufficient
  4. chmod +x /path/to/cmake-3.6.2-Linux-x86_64.sh (use your own file location here, but chmod makes the script executable)
  5. sudo /path/to/cmake-3.6.2-Linux-x86_64.sh (you'll need to press y twice)
    The script installs to /opt/cmake-3.6.2-Linux-x86_64 so in order to get the cmakecommand, make a symbolic link:
  6. sudo ln -s /opt/cmake-3.6.2-Linux-x86_64/bin/* /usr/local/bin
    Test your results with cmake --version

Wednesday, December 5, 2018

Egomotion


The goal of estimating the egomotion of a camera is to determine the 3D motion of that camera within the environment using a sequence of images taken by the camera.

6D-Vision helps to resolve the issue: from a few stationary 3D points one can determine the complete motion state of the vehicle (rotation and translation) precisely.

A lot current works assume that the scenes they are interested in are mostly rigid, i.e., the scene appearance change across different frames is dominated by the camera motion.

Depth camera survey

source


Depth Camera Categories


Monday, October 22, 2018

ISSUE: Failed to start reboot.target: Connection timed out

When rebooting

Failed to start reboot.target: Connection timed out
See system logs and 'systemctl status reboot.target' for details.

Solution
$ sudo systemctl --force --force reboot

Monday, September 24, 2018

Docker network error

When try the example in
https://docs.docker.com/get-started/part2/#build-the-app

Error:
pip network error
Retrying (Retry(total=4, connect=None, read=None, redirect=None, status=None)) after connection broken by 'ProxyError('Cannot connect to proxy.', error('Tunnel connection failed: 404 Not Found',))': /simple/flask/

Solution:
Along with below Proxy configuration in DockerFile

ENV http_proxy http://proxy-chain.xxx.com:911/
ENV https_proxy http://proxy-chain.xxx.com:912/

and use docker build command with following argument


$ docker build --no-cache --network=host -t friendlyhello .

Error
 RUN apt-get update && apt-get upgrade -y python3-pip
Err:1 http://archive.ubuntu.com/ubuntu xenial InRelease
  Temporary failure resolving 'archive.ubuntu.com'

Solution

$ docker build --no-cache --network=host -t <dockername> .

Thursday, June 28, 2018

Ubuntu mount local network shared folder

Server end

  • Install Samba
    • sudo apt-get update
      sudo apt-get install samba
  • Set a password for your user in Samba
    • sudo smbpasswd -a <user_name>
      • Note: Samba uses a separate set of passwords than the standard Linux system accounts (stored in /etc/samba/smbpasswd), so you'll need to create a Samba password for yourself. This tutorial implies that you will use your own user and it does not cover situations involving other users passwords, groups, etc...
        Tip1: Use the password for your own user to facilitate.
        Tip2: Remember that your user must have permission to write and edit the folder you want to share.
        Eg.:
        sudo chown <user_name> /var/opt/blah/blahblah
        sudo chown :<user_name> /var/opt/blah/blahblah
        Tip3: If you're using another user than your own, it needs to exist in your system beforehand, you can create it without a shell access using the following command :
        sudo useradd USERNAME --shell /bin/false
        
        You can also hide the user on the login screen by adjusting lightdm's configuration, in /etc/lightdm/users.conf add the newly created user to the line :
        hidden-users=
  • Create a directory to be shared
    mkdir /home/<user_name>/<folder_name>
  • Make a safe backup copy of the original smb.conf file to your home folder, in case you make an error
    sudo cp /etc/samba/smb.conf ~
  • Edit the file "/etc/samba/smb.conf"
    sudo nano /etc/samba/smb.conf
    • Once "smb.conf" has loaded, add this to the very end of the file:
      
      [<folder_name>]
      path = /home/<user_name>/<folder_name>
      valid users = <user_name>
      read only = no
      Tip: There Should be in the spaces between the lines, and note que also there should be a single space both before and after each of the equal signs.
  • Restart the samba:
    sudo service smbd restart
  • Once Samba has restarted, use this command to check your smb.conf for any syntax errors
    testparmT

Client end

  •  access your network share
          sudo apt-get install smbclient
          # List all shares:
          smbclient -L //<HOST_IP_OR_NAME>/<folder_name> -U <user>
          # connect:
          smbclient //<HOST_IP_OR_NAME>/<folder_name> -U <user>
    To access your network share use your username (<user_name>) and password through the path "smb://<HOST_IP_OR_NAME>/<folder_name>/" (Linux users) or "\\<HOST_IP_OR_NAME>\<folder_name>\" (Windows users). Note that "<folder_name>" value is passed in "[<folder_name>]", in other words, the share name you entered in "/etc/samba/smb.conf".
    • Note: The default user group of samba is "WORKGROUP".
 2. mount 
sudo mount -o username=<> //172.29.32.184/sharename /media/Data/

for windows
sudo mount -t cifs -o username=<> //172.29.32.184/sharename /media/Data/
  • Note- If you receive the error: wrong fs type, bad option, bad superblock on... make sure you have cifs-utils installed, it may not be installed on your distro by default.
    sudo apt-get install cifs-utils

Sunday, June 24, 2018

BUG: tensorflow tf.scatter_nd will accumulate (or undermined) values when indices have duaplicates

Problem:
WARNING: The order in which updates are applied is nondeterministic, so the output will be nondeterministic if indicescontains duplicates.

Solution:
https://github.com/tensorflow/tensorflow/issues/8102

If you are in the unpooling business:
@teramototoya what I did as a hack: with https://www.tensorflow.org/api_docs/python/tf/unique_with_counts i counted the multiplication in the indices and i divided the tensor which was holding the values (aka tensor named 'updates' in the first comment) with this counter
so when add() comes it will undo what the division made
If not, so your problem is general, then you have to somehow flatten your indices, and then tf.unique, see this post:
https://stackoverflow.com/questions/44117430/how-to-use-tf-scatter-nd-without-accumulation


2. Solution
Use a count auxilliary tensor.

cntOnes = tf.ones_like(dmVis, tf.float32)
vals = tf.stack([dmVis, mlVis, cntOnes], axis=1)
scatter_shape = tf.constant([bs, h*upsample, w*upsample, 3])
dmc = tf.scatter_nd(locVis, vals, scatter_shape)
dm, ml, cnt = tf.unstack(dmc, axis=-1)
cnt = cnt + epsilon
dm = dm / cnt

Monday, June 4, 2018

Remote VSCode Setup

Remote VSCode Setup


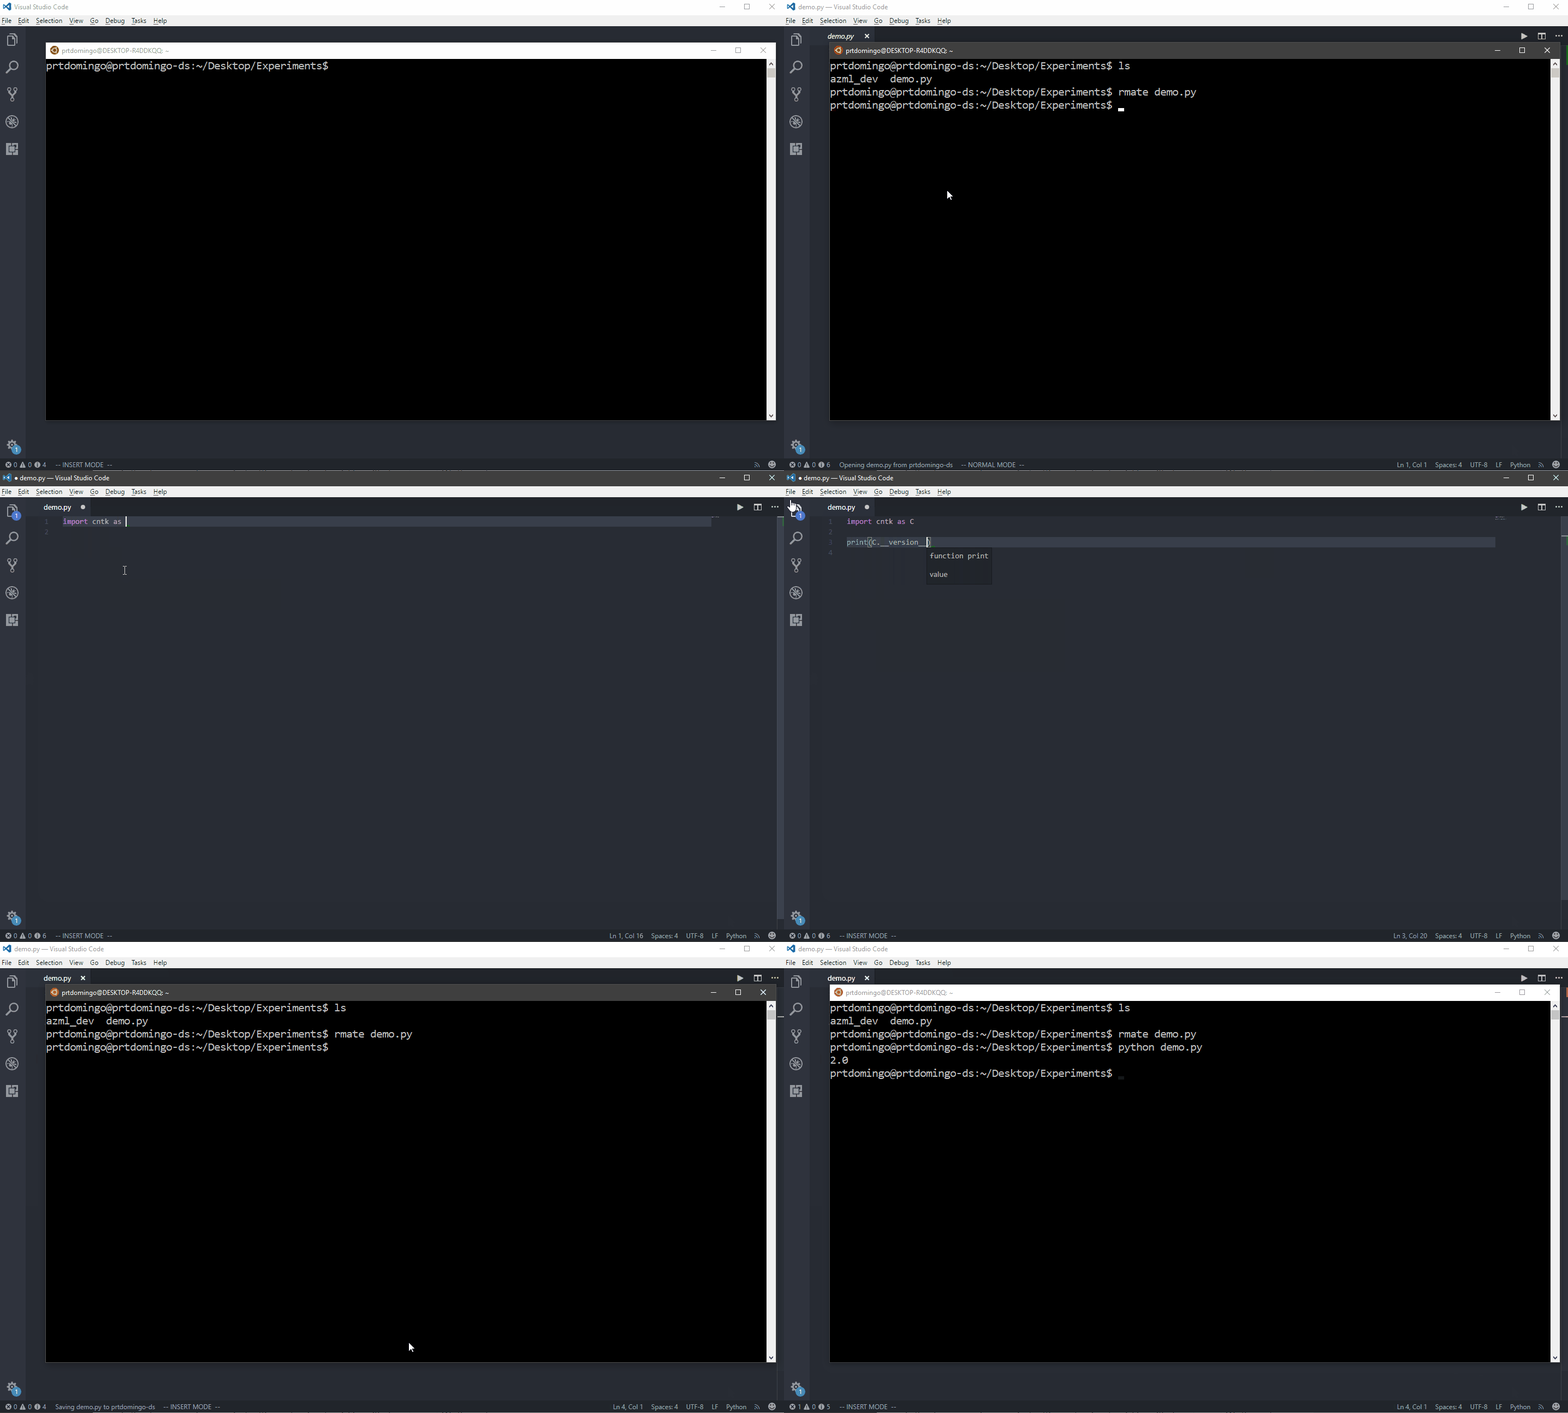
So this is where the Remote VSCode comes in. Remote VSCode is a Visual Studio Code extension that is available in all platforms supported by VSCode (yes, including both Windows and macOS), that implements the Textmate’s ‘rmate’ feature. This extension allows you to edit your files from your virtual machine a lot easier.
To use the extension, do the following:
  1. Launch Visual Studio Code, or install it here if you don’t have it yet
  2. Go to the ‘Extensions’ page and search for ‘Remote VSCode’
I already had the extension installed here
3. Install the extension and re-launch Visual Studio Code
4. In your Linux Virtual Machine, execute the following command in your terminal to install rmate
$ sudo wget -O /usr/local/bin/rmate https://raw.github.com/aurora/rmate/master/rmate
$ sudo chmod a+x /usr/local/bin/rmate
5. Go back to your Visual Studio Code and open up the command palette (CTRL+P for Windows and CMD+P for Mac) then execute the >Remote: Start Server command.
6. Once the server is ready, open up a new terminal and connect to your Linux Virtual Machine using the following command:
$ ssh -R 52698:localhost:52698 VIRTUAL_MACHINE_IP_ADDRESS
7. In your terminal, execute the rmate command with the file that you want to open up in your Visual Studio Code in your local machine
$ rmate demo.py
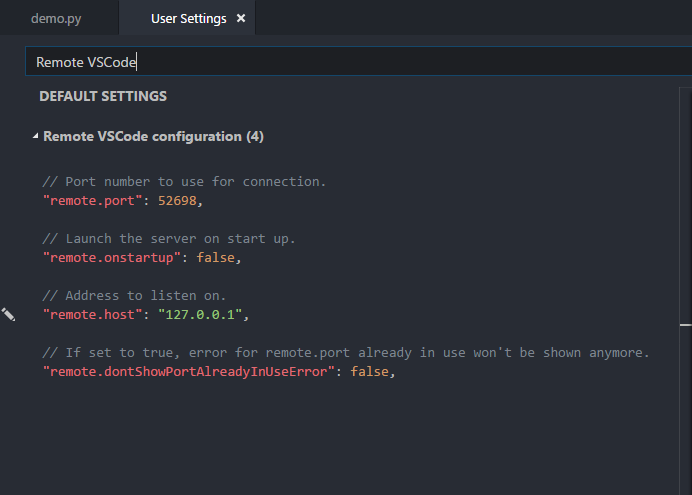
Just in case you’re also wondering where the 52698 port came from, it’s actually the default port that Remote VSCode is using. You can find and change that setting by simply going to your ‘User Preferences’ and search for ‘Remote VSCode configuration’.

Monday, May 21, 2018

Motivation of 3D Scene Understanding

Some extract from papers, but may be minorly modified by me.

Data-Driven 3D Primitives for Single Image Understanding

How do you infer the 3D properties of the world from a 2D image? This question has intrigued researchers in psychology and computer vision for decades. Over the years, researchers have proposed many theories to explain how the brain can recover rich information about the 3D world from a single 2D projection. While there is agreement on many of the cues and constraints involved (e.g., texture gradient and planarity), recovering the 3D structure of the world from a single image is still an enormously difficult and unsolved problem.
    At the heart of the 3D inference problem is the question: What are the right primitives (representations) for inferring the 3D world from a 2D image? It is not clear what kind of 3D primitives can be directly detected in images and be used for subsequent 3D reasoning. There is a rich literature proposing a myriad of 3D primitives ranging from edges and surfaces to volumetric primitives such as generalized cylinders, geons and cuboids. While these 3D primitives make sense intuitively, they are often hard to detect because they are not discriminative in appearance. On the other hand, primitives based on appearance might be easy to detect but can be geometrically uninformative.
    They propose geometric primitives which are visually-discriminative, or easily recognized in a scene, and geometrically-informative, or conveying information about the 3D world when recognized.

GeoNet: Geometric Neural Network for Joint Depth and Surface Normal Estimation

Albeit the great advancement in this filed (depth estimation), we notice that most previous methods deal with depth and normal estimation independently, which possibly make their prediction inconsistent without considering the close underlying geometry relationship. For example, as demonstrated in [], the predicted depth map cloud be distorted in planar regions. It is thus intriguing to ask what if one considers the fact that surface normal does not change much in planar regions. This thought motivates us to design new models, which are exactly based on above simple fact and yet potentially show a vital direction in this field, to exploit the inevitable geometric relationship between depth and surface normal for more accurate estimation.

Wednesday, May 2, 2018

undefined reference to `xcb_dri3*'

Problem:
/usr/lib/x86_64-linux-gnu/libGL.so: undefined reference to `xcb_dri3_buffers_from_pixmap

Analysis:
1. libGL.so not working
2. xcb not working

Solution:
1. check if libGL.so is working
ldd  /usr/lib/x86_64-linux-gnu/libGL.so
if working: go to step 2
if not: install opengl

2. add -lxcb -lxcb-dri3
Note that we need to add all libs in the target makefile or qt pro file. Actually, I fix this with this solution.

3. sudo apt-get update
add -lxcb -lxcb-dri3


Wednesday, March 28, 2018

modify tensorflow checkpoint path

The saved checkpoint stored the model absolute path. If you changed some path, you need to update the stored paths in checkpoint.

Two functions in
https://github.com/tensorflow/tensorflow/blob/r1.6/tensorflow/python/training/saver.py

1. get original state
get_checkpoint_state(checkpoint_dir, latest_filename=None)

2. Update the paths, similar in the got paths

def update_checkpoint_state(save_dir,model_checkpoint_path,
all_model_checkpoint_paths=None,
latest_filename=None)

# all_model_checkpoint_paths is a list