Monday, June 4, 2018

Remote VSCode Setup

Remote VSCode Setup


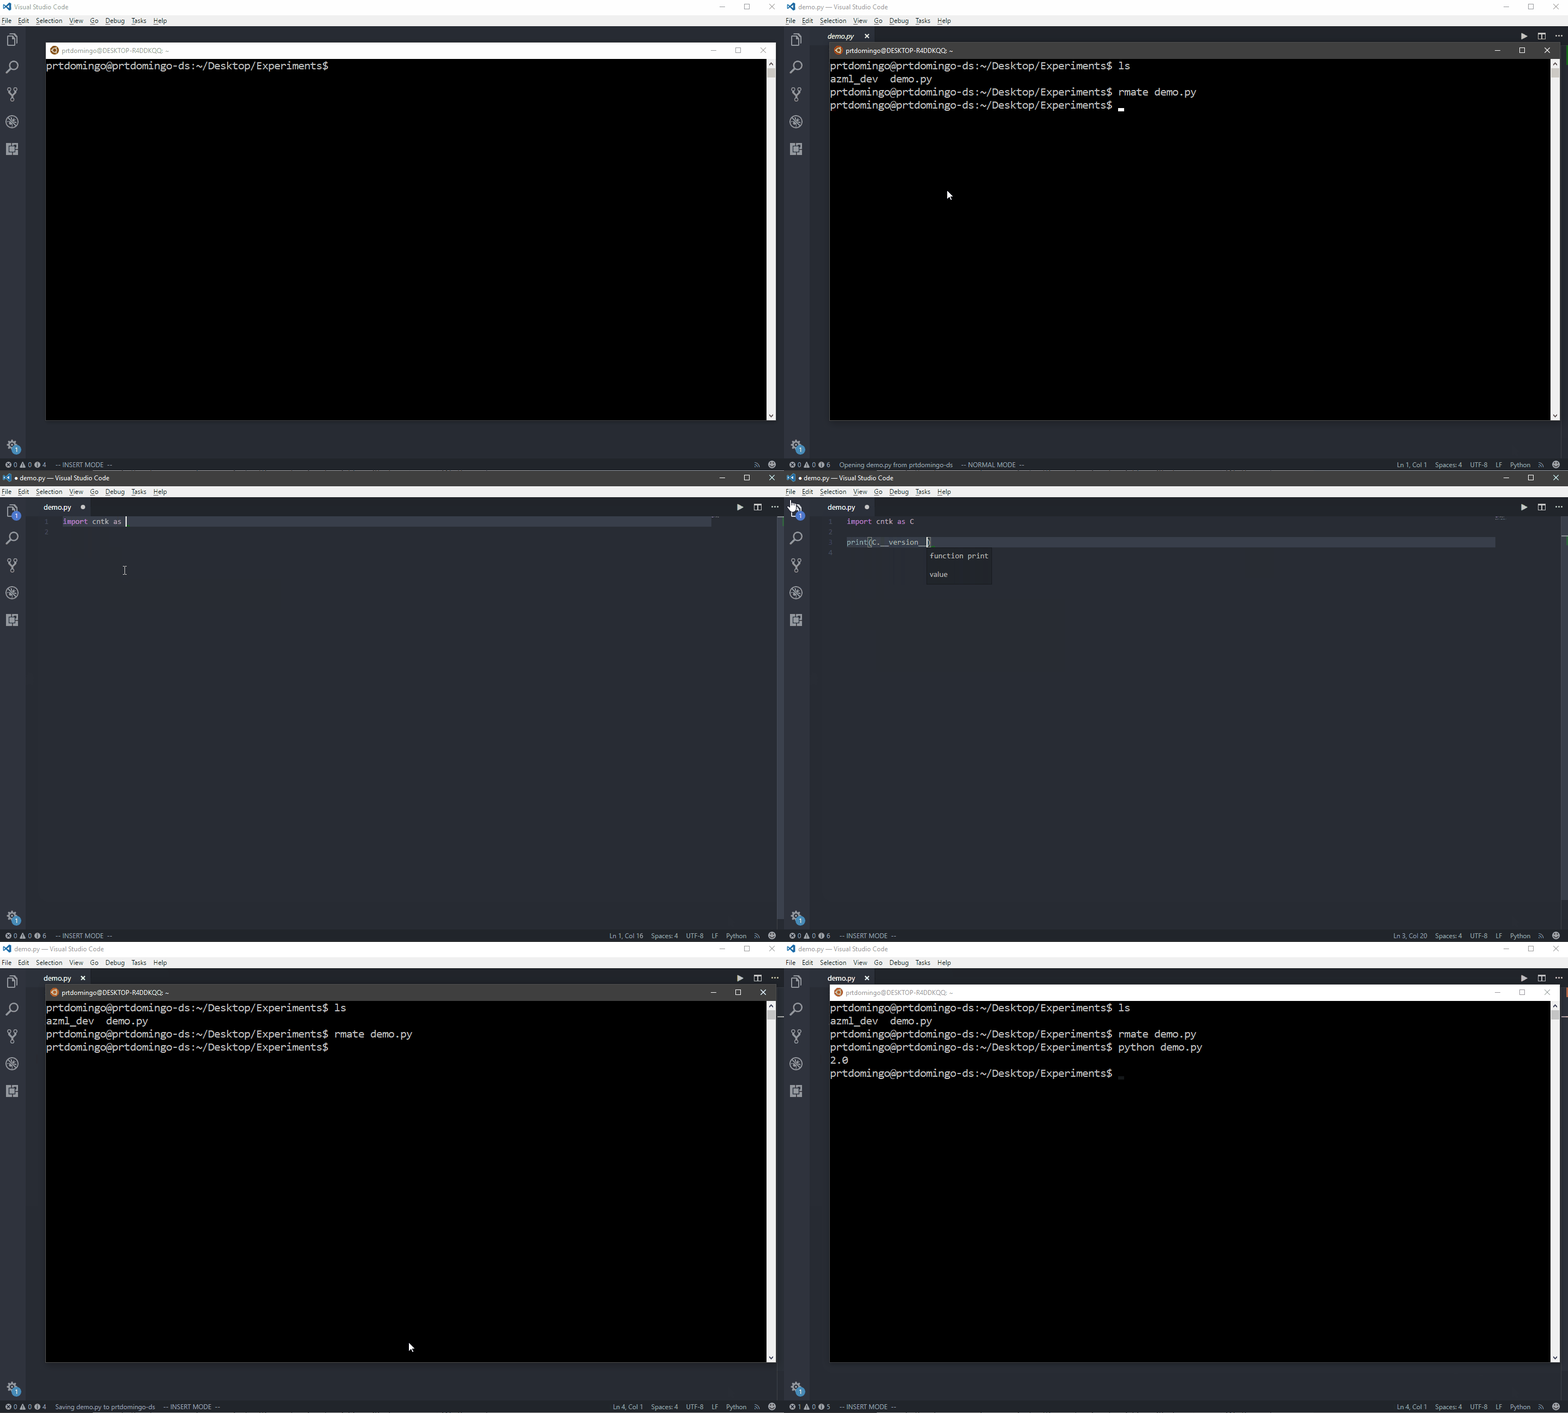
So this is where the Remote VSCode comes in. Remote VSCode is a Visual Studio Code extension that is available in all platforms supported by VSCode (yes, including both Windows and macOS), that implements the Textmate’s ‘rmate’ feature. This extension allows you to edit your files from your virtual machine a lot easier.
To use the extension, do the following:
  1. Launch Visual Studio Code, or install it here if you don’t have it yet
  2. Go to the ‘Extensions’ page and search for ‘Remote VSCode’
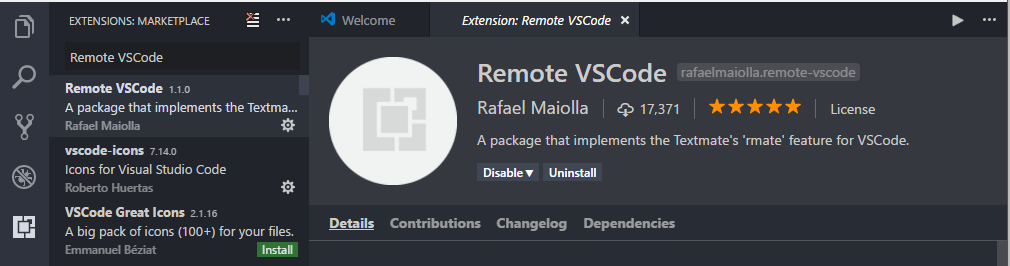
I already had the extension installed here
3. Install the extension and re-launch Visual Studio Code
4. In your Linux Virtual Machine, execute the following command in your terminal to install rmate
$ sudo wget -O /usr/local/bin/rmate https://raw.github.com/aurora/rmate/master/rmate
$ sudo chmod a+x /usr/local/bin/rmate
5. Go back to your Visual Studio Code and open up the command palette (CTRL+P for Windows and CMD+P for Mac) then execute the >Remote: Start Server command.
6. Once the server is ready, open up a new terminal and connect to your Linux Virtual Machine using the following command:
$ ssh -R 52698:localhost:52698 VIRTUAL_MACHINE_IP_ADDRESS
7. In your terminal, execute the rmate command with the file that you want to open up in your Visual Studio Code in your local machine
$ rmate demo.py
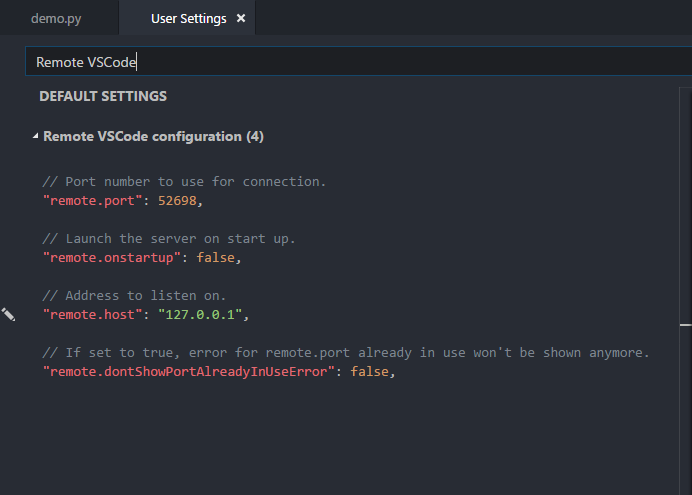
Just in case you’re also wondering where the 52698 port came from, it’s actually the default port that Remote VSCode is using. You can find and change that setting by simply going to your ‘User Preferences’ and search for ‘Remote VSCode configuration’.
Monday, May 21, 2018

Motivation of 3D Scene Understanding

Some extract from papers, but may be minorly modified by me.

Data-Driven 3D Primitives for Single Image Understanding

How do you infer the 3D properties of the world from a 2D image? This question has intrigued researchers in psychology and computer vision for decades. Over the years, researchers have proposed many theories to explain how the brain can recover rich information about the 3D world from a single 2D projection. While there is agreement on many of the cues and constraints involved (e.g., texture gradient and planarity), recovering the 3D structure of the world from a single image is still an enormously difficult and unsolved problem.
    At the heart of the 3D inference problem is the question: What are the right primitives (representations) for inferring the 3D world from a 2D image? It is not clear what kind of 3D primitives can be directly detected in images and be used for subsequent 3D reasoning. There is a rich literature proposing a myriad of 3D primitives ranging from edges and surfaces to volumetric primitives such as generalized cylinders, geons and cuboids. While these 3D primitives make sense intuitively, they are often hard to detect because they are not discriminative in appearance. On the other hand, primitives based on appearance might be easy to detect but can be geometrically uninformative.
    They propose geometric primitives which are visually-discriminative, or easily recognized in a scene, and geometrically-informative, or conveying information about the 3D world when recognized.

GeoNet: Geometric Neural Network for Joint Depth and Surface Normal Estimation

Albeit the great advancement in this filed (depth estimation), we notice that most previous methods deal with depth and normal estimation independently, which possibly make their prediction inconsistent without considering the close underlying geometry relationship. For example, as demonstrated in [], the predicted depth map cloud be distorted in planar regions. It is thus intriguing to ask what if one considers the fact that surface normal does not change much in planar regions. This thought motivates us to design new models, which are exactly based on above simple fact and yet potentially show a vital direction in this field, to exploit the inevitable geometric relationship between depth and surface normal for more accurate estimation.

Wednesday, May 2, 2018

undefined reference to `xcb_dri3*'

Problem:
/usr/lib/x86_64-linux-gnu/libGL.so: undefined reference to `xcb_dri3_buffers_from_pixmap

Analysis:
1. libGL.so not working
2. xcb not working

Solution:
1. check if libGL.so is working
ldd  /usr/lib/x86_64-linux-gnu/libGL.so
if working: go to step 2
if not: install opengl

2. add -lxcb -lxcb-dri3
Note that we need to add all libs in the target makefile or qt pro file. Actually, I fix this with this solution.

3. sudo apt-get update
add -lxcb -lxcb-dri3


Wednesday, March 28, 2018

modify tensorflow checkpoint path

The saved checkpoint stored the model absolute path. If you changed some path, you need to update the stored paths in checkpoint.

Two functions in
https://github.com/tensorflow/tensorflow/blob/r1.6/tensorflow/python/training/saver.py

1. get original state
get_checkpoint_state(checkpoint_dir, latest_filename=None)

2. Update the paths, similar in the got paths

def update_checkpoint_state(save_dir,model_checkpoint_path,
all_model_checkpoint_paths=None,
latest_filename=None)

# all_model_checkpoint_paths is a list

Friday, January 12, 2018

tensorflow c++ compiling problems

Problem 1

fatal error: third_party/eigen3/unsupported/Eigen/CXX11/Tensor: No such file or directory

if you pip install using virtual environment, the include files are not copied.

Solution

1. Dirty one. Install tensorflow globally.
2. The including files will be copied to
 /usr/local/lib/python2.7/dist-packages/tensorflow/
Thus, we only need to copy them to ~/tensorflow/include python2.7.
The source files are stored in
tensorflow-1.5.0-rc0/third_party/eigen3/unsupported/Eigen/CXX11


Problem 2

fatal error: nsync_cv.h: No such file or directory
fatal error: nsync_mu.h: No such file or directory

Solution

1. modify source c++ file
find /usr/local/lib/python2.7/dist-packages/tensorflow/ -name "nsync_mu.h"
/usr/local/lib/python2.7/dist-packages/tensorflow/include/external/nsync/public/nsync_mu.h

modify line 25 and 26 to include right path in /usr/local/lib/python2.7/dist-packages/tensorflow/include/tensorflow/core/platform/default/mutex.h

2. 
or modify makefile to add include path
add nsync_cv.h include:-I$TF_INC/external/nsync/public
below is official demo
TF_INC=$(python -c 'import tensorflow as tf; print(tf.sysconfig.get_include())')
TF_LIB=$(python -c 'import tensorflow as tf; print(tf.sysconfig.get_lib())')
g++ -std=c++11 -shared zero_out.cc -o zero_out.so -fPIC -I$TF_INC -I$TF_INC/external/nsync/public -L$TF_LIB -ltensorflow_framework -O2

Problem 3

Using tensorboard
  File "/home/jinglu/tensorflow/bin/tensorboard", line 7, in <module>
    from tensorboard.main import run_main

Solution

pip install tb-nightly

Problem 4


Undefined symbol: _ZTIN10tensorflow8OpKernelE

Solution

add the flags in g++
-L $TF_LIB -ltensorflow_framework 

Thursday, January 11, 2018

Add/Delete sudo user


Steps to Create a New Sudo User


  1. Log in to your server as the root user.
    • ssh root@server_ip_address
  2. Use the adduser command to add a new user to your system.
    Be sure to replace username with the user that you want to create.
    • adduser username
    • Set and confirm the new user's password at the prompt. A strong password is highly recommended!
      Set password prompts:
      Enter new UNIX password: Retype new UNIX password: passwd: password updated successfully
    • Follow the prompts to set the new user's information. It is fine to accept the defaults to leave all of this information blank.
      User information prompts:
      Changing the user information for username Enter the new value, or press ENTER for the default Full Name []: Room Number []: Work Phone []: Home Phone []: Other []: Is the information correct? [Y/n]
  3. Use the usermod command to add the user to the sudo group.
    • usermod -aG sudo username
    By default, on Ubuntu, members of the sudo group have sudo privileges.
  4. Test sudo access on new user account
    • Use the su command to switch to the new user account.
      • su - username
    • As the new user, verify that you can use sudo by prepending "sudo" to the command that you want to run with superuser privileges.
      • sudo command_to_run
    • For example, you can list the contents of the /root directory, which is normally only accessible to the root user.
      • sudo ls -la /root
    • The first time you use sudo in a session, you will be prompted for the password of the user account. Enter the password to proceed.
      Output:
      [sudo] password for username:
      If your user is in the proper group and you entered the password correctly, the command that you issued with sudo should run with root privileges.

How To Delete a User

In the event that you no longer need a user, it is best to delete the old account.
You can delete the user itself, without deleting any of his or her files by typing this as root:
deluser newuser
If you are signed in as another non-root user with sudo privileges, you could instead type:
sudo deluser newuser
If, instead, you want to delete the user's home directory when the user is deleted, you can issue the following command as root:
deluser --remove-home newuser
If you're running this as a non-root user with sudo privileges, you would instead type:
sudo deluser --remove-home newuser
If you had previously configured sudo privileges for the user you deleted, you may want to remove the relevant line again by typing:
visudo
Or use this if you are a non-root user with sudo privileges:
sudo visudo
root    ALL=(ALL:ALL) ALL
newuser ALL=(ALL:ALL) ALL   # DELETE THIS LINE
This will prevent a new user created with the same name from being accidentally given sudo privileges.

Monday, December 18, 2017

ssh login timeout but scp works

Problem:
ssh login timeout
scp and sftp work

Analysis:

scp and sftp working means port 22 works.

This was due to my router blocking TCP keepalive messages when I connected wirelessly (go figure).
Solution:
ssh my_server -o TCPKeepAlive=no 

From the documentation:
TCPKeepAlive
  Specifies whether the system should send TCP keepalive messages
  to the other side. If they are sent, death of the connection or
  crash of one of the machines will be properly noticed.  However,
  this means that connections will die if the route is down tem-
  porarily, and some people find it annoying.  On the other hand,
  if TCP keepalives are not sent, sessions may hang indefinitely on
  the server, leaving "ghost" users and consuming server resources.

  The default is "yes" (to send TCP keepalive messages), and the
  server will notice if the network goes down or the client host
  crashes.  This avoids infinitely hanging sessions.

  To disable TCP keepalive messages, the value should be set to
  "no".